はじめに
Windows 10やUbuntuでOpenVINOを確認して来ましたが、久々にmacOS Big Sur でopenvino_2021.2.185を実行してみます。
本記事はOpenVINOを動かす事を目的に試行した内容になります。お手持ちの環境で動作するヒントになれば幸いです。
使用したハードウェアは以下の通りです。
  機種名:	MacBook Pro
  機種ID:	MacBookPro15,2
  プロセッサ名:	クアッドコアIntel Core i7
  プロセッサ速度:	2.7 GHz
  プロセッサの個数:	1
  コアの総数:	4
  二次キャッシュ(コア単位):	256 KB
  三次キャッシュ:	8 MB
  ハイパー・スレッディング・テクノロジ:	有効
  メモリ:	16 GB
OpenVINOの公式ページから2021.2.185をダウンロードしてインストールしてください。本記事はセットアップの流れが終わったという前提で始めます。
ターミナル起動時setupvars.shでwarningが出る事象への対処
Last login: Thu Dec 24 18:34:05 on ttys000
[setupvars.sh] WARNING: Can not find OpenVINO Python binaries by path /Users/python
[setupvars.sh] WARNING: OpenVINO Python environment does not set properly
[setupvars.sh] OpenVINO environment initialized
ターミナルを起動します。あれ、pythonのパスが/Users/pythonになっていますね。環境変数を確認してみましょう。
~ % echo $INTEL_OPENVINO_DIR
/Users
$INTEL_OPENVINO_DIR が変です。Usersではありません。なんでしょう。.zshrcにexport INTEL_OPENVINO_DIR=”/opt/intel/openvino_2021/” を追記してみましたが、変わらずでした。(setupvars.sh内で設定しているからでした。)
という訳で、setupvars.sh内で直接設定してみます。

再度ターミナルを開くと、メッセージが変わりました。
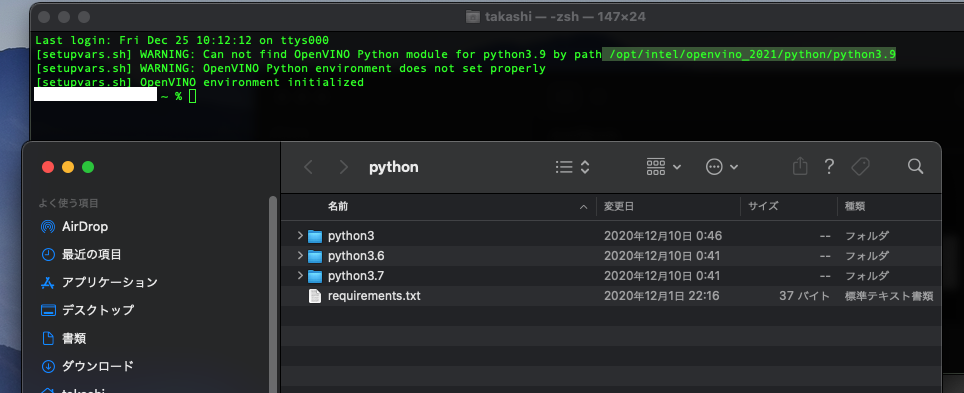
Last login: Fri Dec 25 10:12:12 on ttys000
[setupvars.sh] WARNING: Can not find OpenVINO Python module for python3.9 by path /opt/intel/openvino_2021/python/python3.9
[setupvars.sh] WARNING: OpenVINO Python environment does not set properly
[setupvars.sh] OpenVINO environment initialized
ん?3.9?Python 3.9はありませんよ。

setupvars.shを編集して、python_versionを3.7に設定します。

ターミナルを再度起動してみます。無事warningが消えました。

human_pose_estimation_demoを実行してみる
setupvar.shが動作したみたいなので、pythonデモを実行してみますが、import cv2でエラーになりました(画面撮り忘れ)
rpathが解決出来ていないようだったので、install_name_toolで追加します。
% sudo install_name_tool -add_rpath /opt/intel/openvino_2021.2.185/opencv/lib/ /opt/intel/openvino_2021/python/python3/cv2.so
% sudo install_name_tool -add_rpath /opt/intel/openvino_2021.2.185/deployment_tools/inference_engine/lib/intel64/ /opt/intel/openvino_2021/python/python3/cv2.so
上記を実行すると、import cv2をしてもエラーになりませんでした。
% python3
Python 3.7.7 (default, Nov 12 2020, 17:58:53)
[Clang 12.0.0 (clang-1200.0.32.21)] on darwin
Type "help", "copyright", "credits" or "license" for more information.
>>> import cv2
>>>
human_pose_estimation.pyの実行
human_pose_estimation.pyを実行してみます。
% python3 human_pose_estimation.py -h
Traceback (most recent call last):
  File "human_pose_estimation.py", line 30, in <module>
    from human_pose_estimation_demo.model import HPEAssociativeEmbedding, HPEOpenPose
  File "/Users//omz_demos_build/python_demos/human_pose_estimation_demo/human_pose_estimation_demo/model.py", line 23, in <module>
    import ngraph as ng
  File "/opt/intel/openvino_2021/python/python3.7/ngraph/__init__.py", line 26, in <module>
    from ngraph.impl import Node
  File "/opt/intel/openvino_2021/python/python3.7/ngraph/impl/__init__.py", line 35, in <module>
    from _pyngraph import Dimension
ImportError: dlopen(/opt/intel/openvino_2021/python/python3.7/_pyngraph.cpython-37m-darwin.so, 2): Library not loaded: @rpath/libonnx_importer.dylib
  Referenced from: /opt/intel/openvino_2021/python/python3.7/_pyngraph.cpython-37m-darwin.so
  Reason: image not found
まだ出ますね。install_name_tool を使って、rpathで足りないものを追加します。
% sudo install_name_tool -add_rpath /opt/intel/openvino_2021.2.185/deployment_tools/ngraph/lib /opt/intel/openvino_2021/python/python3.7/_pyngraph.cpython-37m-darwin.soOK。-hが通るようになりました。
human_pose_estimation_demo % python3 human_pose_estimation.py -h
usage: human_pose_estimation.py [-h] -i INPUT -m MODEL -at {ae,openpose}
                                [--tsize TSIZE] [-t PROB_THRESHOLD] [-r]
                                [-d DEVICE] [-nireq NUM_INFER_REQUESTS]
                                [-nstreams NUM_STREAMS]
                                [-nthreads NUM_THREADS] [-loop LOOP]
                                [-no_show] [-u UTILIZATION_MONITORS]

Options:
  -h, --help            Show this help message and exit.
  -i INPUT, --input INPUT
                        Required. Path to an image, video file or a numeric
                        camera ID.
  -m MODEL, --model MODEL
                        Required. Path to an .xml file with a trained model.
  -at {ae,openpose}, --architecture_type {ae,openpose}
                        Required. Type of the network, either "ae" for
                        Associative Embedding or "openpose" for OpenPose.
  --tsize TSIZE         Optional. Target input size. This demo implements
                        image pre-processing pipeline that is common to human
                        pose estimation approaches. Image is resize first to
                        some target size and then the network is reshaped to
                        fit the input image shape. By default target image
                        size is determined based on the input shape from IR.
                        Alternatively it can be manually set via this
                        parameter. Note that for OpenPose-like nets image is
                        resized to a predefined height, which is the target
                        size in this case. For Associative Embedding-like nets
                        target size is the length of a short image side.
  -t PROB_THRESHOLD, --prob_threshold PROB_THRESHOLD
                        Optional. Probability threshold for poses filtering.
  -r, --raw_output_message
                        Optional. Output inference results raw values showing.
  -d DEVICE, --device DEVICE
                        Optional. Specify the target device to infer on; CPU,
                        GPU, FPGA, HDDL or MYRIAD is acceptable. The sample
                        will look for a suitable plugin for device specified.
                        Default value is CPU.
  -nireq NUM_INFER_REQUESTS, --num_infer_requests NUM_INFER_REQUESTS
                        Optional. Number of infer requests
  -nstreams NUM_STREAMS, --num_streams NUM_STREAMS
                        Optional. Number of streams to use for inference on
                        the CPU or/and GPU in throughput mode (for HETERO and
                        MULTI device cases use format
                        <device1>:<nstreams1>,<device2>:<nstreams2> or just
                        <nstreams>)
  -nthreads NUM_THREADS, --num_threads NUM_THREADS
                        Optional. Number of threads to use for inference on
                        CPU (including HETERO cases)
  -loop LOOP, --loop LOOP
                        Optional. Number of times to repeat the input.
  -no_show, --no_show   Optional. Don't show output
  -u UTILIZATION_MONITORS, --utilization_monitors UTILIZATION_MONITORS
                        Optional. List of monitors to show initially.
デモを実行してみます。
% python3 human_pose_estimation.py -i walking.mov -m ./human-pose-estimation-0001/FP16/human-pose-estimation-0001.xml -at openpose
[ INFO ] Initializing Inference Engine...
[ INFO ] Loading network...
[ INFO ] Using USER_SPECIFIED mode
[ INFO ] Reading network from IR...
[ INFO ] Loading network to plugin...
[ INFO ] Reading network from IR...
[ INFO ] Loading network to plugin...
[ INFO ] Starting inference...
To close the application, press 'CTRL+C' here or switch to the output window and press ESC key
To switch between min_latency/user_specified modes, press TAB key in the output window
[ INFO ]
[ INFO ] Mode: USER_SPECIFIED
[ INFO ] FPS: 10.7
[ INFO ] Latency: 64.1 ms
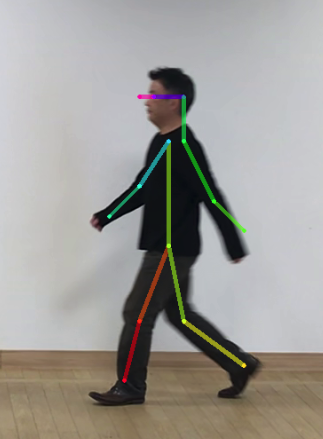
無事実行できました!
まとめ
今回のポイントは以下の2点です。ご参考になれば幸いです。
- setupvar.shを正常に実行するようにする。
- rpathの問題を解消する。

フリーのITエンジニア(何でも屋さん)。趣味は渓流釣り、サッカー観戦、インラインホッケー、アイスホッケー、RaspberryPiを使った工作など。AI活用に興味があり試行錯誤中です。

