Supre Resolution C++ Demoを使って画像変換
Open Model Zoo内のDemoに格納されている
Supre Resolution C++ Demo を使って超解像の実験をしてみましょう
実行環境
CPU: Intel(R) Core(TM) i7-6770HQ CPU @ 2.60GHz
MemTotal: 16318440 kB
OS: Ubuntu 16.04LTS
モデルのダウンロード
 * `single-image-super-resolution-1032`, which is the model that performs super resolution 4x upscale on a 270x480 image
 * `single-image-super-resolution-1033`, which is the model that performs super resolution 3x upscale on a 360x640 image
 * `text-image-super-resolution-0001`, which is the model that performs super resolution 3x upscale on a 360x640 image
このデモでは3つのモデルが使用できます
single-image-super-resolution-1032は480×270の画像を対象にしたモデル
single-image-super-resolution-1033は640×360の画像を対象にしたモデル
text-image-super-resolution-0001は文字画像向きのモデルです
全ての出力画像は画像サイズが1920×1080となります
/opt/intel/openvino/deployment_tools/open_model_zoo/tools/downloader/downloader.py --name single-image-super-resolution-* -o ~/models

/opt/intel/openvino/deployment_tools/open_model_zoo/tools/downloader/downloader.py --name text-image-super-resolution-0001 -o ~/models
上記コマンドで、全てのモデルをダウンロードしてみます
対象画像の作成
対象画像を作成します
適当な画像を使用しますが、この際にimagemagickのconvertコマンドが役に立ちます
convert inputfile -resize 480x270! outputfile
上記のコマンドを実行することにより、アスペクト比を無視して、480×270の画像を作成できます

今回使用した画像は上記の画像となります
アマゾンのコマーシャル画像で、程々にテキストと人が混じっています
超解像の実行
ではこの画像を元に超解像を実行します
omz_demos_build/intel64/Release/super_resolution_demo -m models/intel/single-image-super-resolution-1032/FP16/single-image-super-resolution-1032.xml -i test_images/amazon.png
上記コマンドを実行すると、カレントフォルダにsr_1.pngと言う名称の画像が作成されます
こちらが超解像画像となります

Webですので見た目ではそれほど判断がつきにくいと思います
ImageMagickのconverコマンドで拡大したのち、切り出した画像と比較してみましょう
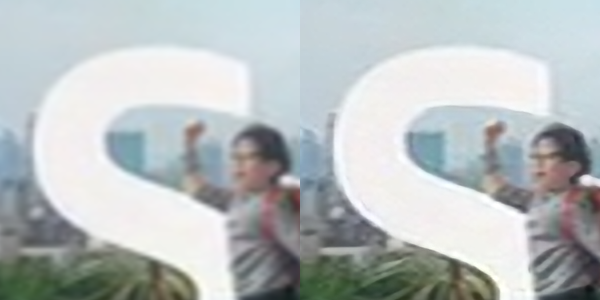
左がImageMagickでの切り出し画像、右が超解像の切り出し画像となります
Sの周りがシャープになり、人物のメガネ、ランドセル、服のシワなどがはっきりとしています
続く
産業用画像処理装置開発、
ゲームコンソール開発、半導体エンジニアなどを経て、
Webエンジニア&マーケティングをやっています
好きな分野はハードウェアとソフトウェアの境界くらい